728x90
반응형
웹 클라이언트(Web Client)
- 웹 서버에 페이지를 요청하고, 서버가 응답한 결과를 화면에 출력
- 종류(브라우저) - 사파리, 크롬, 오페라, 파이어 폭스, IE, 엣지
웹 서버(Web Server)
- 웹 서버는 클라이언트로부터 요청 받은 페이지를 찾아 CGI(JSP, ASP, PHP)를 해석, 수행한 후 결과를 HTML, JS, CSS 등을 클라이언트에게 전송
- 종류 - Apache, Nginx, IIS, node.js, WebtoB
웹 서비스 구성
http://www.mojito.com/login/user.php?no=174569&id=mojito&pw=1234
- http - 프로토콜
- www.mojito.com/login/user.php - 도메인, 경로, 파일
- no=174569 - 인자값(화면처리)
- id=mojito&pw=1234 - 인자값(데이터베이스)
클라이언트 측 언어(프론트 엔드)
- 사용자의 브라우저가 처리하는 언어
- 종류 - HTML, JavaScript, CSS
서버 측 언어(백엔드)
- 서버에서 동작하는 언어
- 종류 - PHP, ASP.NET, C++, Java and JSP, Python, Ruby
웹 서버 구축 실습
- Apache + PHP + MariaDB (APM)
- 리눅스까지 포함되면 LAMP
- CentOS 7에서 아파치 경로 - /var/www/html/
Apache Web Server
- 아파치 소프트웨어 재단에서 관리하는 HTTP 웹 서버
MariaDB
- 오픈 소스의 관계형 데이터베이스 관리 시스템(RDBMS)
- MySQL과 동일한 소스 코드 기반이며, MySQL과 높은 호환성을 유지하기 위하여 명령에 정확히 매칭
*왜 MySQL과 MariaDB는 똑같이 동작하는데 나뉘어졌을까?
→ MySQL 개발자가 오라클과의 라이센스 문제로 회사를 나와 오픈소스로 재창조한 것이 MariaDB
CentOS 7으로 아파치, php, Mariadb 설치하기
1. yum으로 APM 설치하기
sudo yum install -y httpd php mariadb-server php-mysql
2. 아파치 자동 실행 설정
sudo systemctl enable httpd
3. MariaDB 자동 실행 설정
sudo systemctl enable mariadb
4. 아파치 서비스 시작
sudo systemctl start httpd
5. MariaDB 서비스 시작
sudo systemctl start mariadb
6. 방화벽 설정 변경
- 방화벽이 설정되어있는지 확인
sudo iptables -L- 설정이 되어 있다면 모든 설정 날려버리기
sudo iptables -F
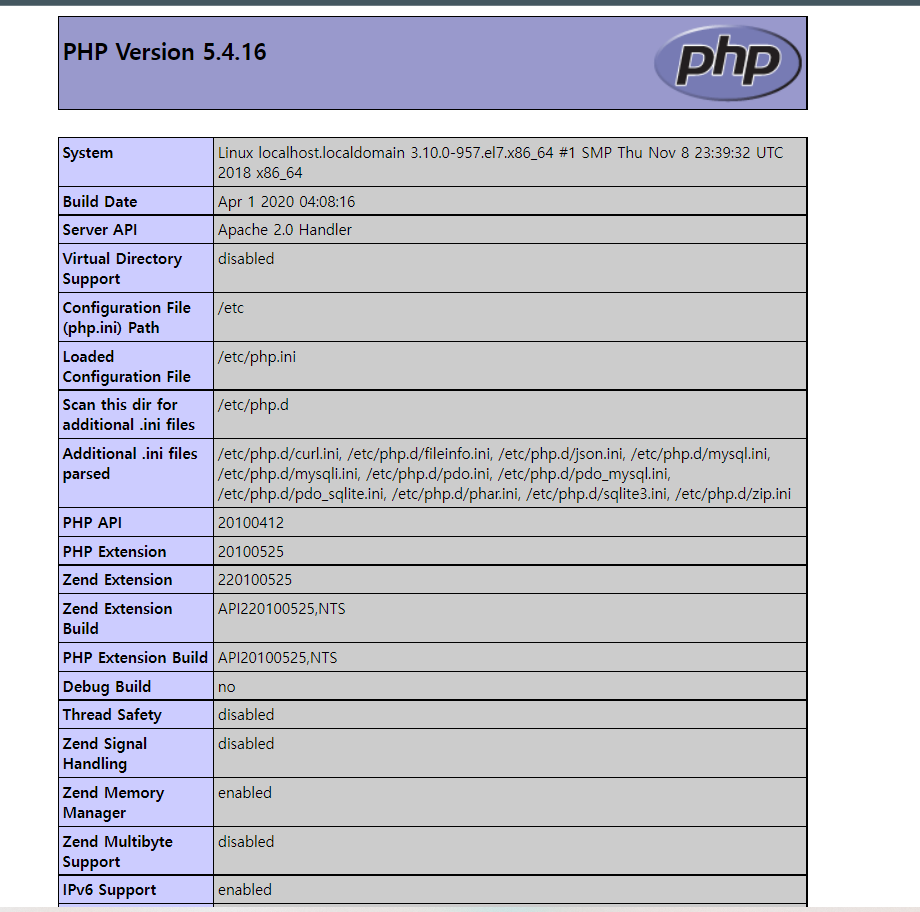
자신의 ip 주소로 접속했을 때 다음과 같은 화면이 나오면 초기설정 성공

MariaDB 서비스 초기화 설정하기
'mysql_secure_installation' 명령어를 통해 초기 root 비밀번호 설정 및 기타 옵션 설정 하기
sudo mysql_secure_installation
출력창:
NOTE: RUNNING ALL PARTS OF THIS SCRIPT IS RECOMMENDED FOR ALL MariaDB
      SERVERS IN PRODUCTION USE!  PLEASE READ EACH STEP CAREFULLY!

In order to log into MariaDB to secure it, we'll need the current
password for the root user.  If you've just installed MariaDB, and
you haven't set the root password yet, the password will be blank,
so you should just press enter here.

Enter current password for root (enter for none):
OK, successfully used password, moving on...

Setting the root password ensures that nobody can log into the MariaDB
root user without the proper authorisation.

Set root password? [Y/n] Y
New password:
Re-enter new password:
Password updated successfully!
Reloading privilege tables..
 ... Success!


By default, a MariaDB installation has an anonymous user, allowing anyone
to log into MariaDB without having to have a user account created for
them.  This is intended only for testing, and to make the installation
go a bit smoother.  You should remove them before moving into a
production environment.

Remove anonymous users? [Y/n] y
 ... Success!

Normally, root should only be allowed to connect from 'localhost'.  This
ensures that someone cannot guess at the root password from the network.

Disallow root login remotely? [Y/n] y
 ... Success!

By default, MariaDB comes with a database named 'test' that anyone can
access.  This is also intended only for testing, and should be removed
before moving into a production environment.

Remove test database and access to it? [Y/n] y
 - Dropping test database...
 ... Success!
 - Removing privileges on test database...
 ... Success!

Reloading the privilege tables will ensure that all changes made so far
will take effect immediately.

Reload privilege tables now? [Y/n] y
 ... Success!

Cleaning up...

All done!  If you've completed all of the above steps, your MariaDB
installation should now be secure.

Thanks for using MariaDB!
MariaDB 설정파일 내 문자형식 설정 추가
sudo vi /etc/my.cnf
만약 my.cnf의 마지막 줄에 “!includedir /etc/my.cnf.d”가 있다면 다음과 같이 진행
sudo vi /etc/my.cnf.d/client.cnf
/etc/my.cnf.d/client.cnf
#
# These two groups are read by the client library
# Use it for options that affect all clients, but not the server
#


[client]
port=3306
default-character-set=utf8

# This group is not read by mysql client library,
# If you use the same .cnf file for MySQL and MariaDB,
# use it for MariaDB-only client options
[client-mariadb]
/etc/my.cnf.d/server.cnf 설정
#
# These groups are read by MariaDB server.
# Use it for options that only the server (but not clients) should see
#
# See the examples of server my.cnf files in /usr/share/mysql/
#

# this is read by the standalone daemon and embedded servers
[server]

# this is only for the mysqld standalone daemon
[mysqld]
init_connect="SET collation_connection = utf8_general_ci"
init_connect="SET NAMES utf8"
character-set-server = utf8
collation-server = utf8_general_ci
# this is only for embedded server
[embedded]

# This group is only read by MariaDB-5.5 servers.
# If you use the same .cnf file for MariaDB of different versions,
# use this group for options that older servers don't understand
[mysqld-5.5]
"/etc/my.cnf.d/server.cnf" 31L, 894C
/etc/my.cnf.d/mysql-clients.cnf 설정
#
# These groups are read by MariaDB command-line tools
# Use it for options that affect only one utility
#

[mysql]
default-character-set = utf8
[mysql_upgrade]

[mysqladmin]

[mysqlbinlog]

[mysqlcheck]

[mysqldump]

[mysqlimport]

[mysqlshow]

[mysqlslap]

"/etc/my.cnf.d/mysql-clients.cnf" 23L, 260C
설정이 잘 적용이 되었는가 확인
mariadb 재시작
sudo systemctl restart mariadb.service
mariadb 접속
sudo mysql -u root -p
c로 시작하는(character) 환경변수들 찾기
show variables like 'c%';
utf8로 변경된 것을 확인
MariaDB [(none)]> show variables like 'c%';
+--------------------------+----------------------------+
| Variable_name            | Value                      |
+--------------------------+----------------------------+
| character_set_client     | utf8                       |
| character_set_connection | utf8                       |
| character_set_database   | utf8                       |
| character_set_filesystem | binary                     |
| character_set_results    | utf8                       |
| character_set_server     | utf8                       |
| character_set_system     | utf8                       |
| character_sets_dir       | /usr/share/mysql/charsets/ |
| collation_connection     | utf8_general_ci            |
| collation_database       | utf8_general_ci            |
| collation_server         | utf8_general_ci            |
| completion_type          | NO_CHAIN                   |
| concurrent_insert        | AUTO                       |
| connect_timeout          | 10                         |
+--------------------------+----------------------------+
Apache + PHP 동작 확인
테스트 파일 생성
sudo vi /var/www/html/index.php
phpinfo() 함수 작성
<?php phpinfo() ?>
apache, php 연동 완료

HTML
- HyperText Markup Language로 웹 페이지를 기술하기 위한 규약이다.
- 프로그래밍 언어가 아닌, 문서가 화면에 표시되는 형식을 나타내거나 데이터의 논리적인 구조를 명시하기 위한 규칙들을 정의한 마크업 언어이다.
기본적인 HTML 코드
<html lang="en">
    <head>
        <meta charset="UTF-8">
        <meta http-equiv="X-UA-Compatible" content="IE=edge">
        <meta name="viewport" content="width=device-width, initial-scale=1.0">
        <title>Hello HTML</title>
    </head>
    <body>
        <p>Hello HTML!</p>
    </body>
</html>
리눅스 CentOS 7 기준 한글 설정
기본으로 설정된 언어인 영어를 제거하고 한글 추가하기

토글키 지정 → 오른쪽 alt

test.html 작성
<!DOCTYPE html>
<html>
    <head>
        <meta charset="UTF-8">
        <title>HTML Tag Example</title>
    </head>
    <body>
        <p>
            <h1>1단계</h1>
            <h2>2단계</h2>
        </p>
        <p>
            <ul>
                <li><b>순서가 없는 첫번째 항목입니다.</b></li>
                <li><i>순서가 없는 두번째 항목입니다.</i>
                    <ol>
                        <li>순서가 있는 첫번째 항목입니다.</li>
                        <li>순서가 있는 두번째 항목입니다.</li>
                    </ol>
                </li>
            </ul>
        </p>
    </body>
"/var/www/html/test.html" 24L, 479C
{아파치ip}/test.html로 접속

4월 11일(월) 프로그래밍 기초(웹) 과제
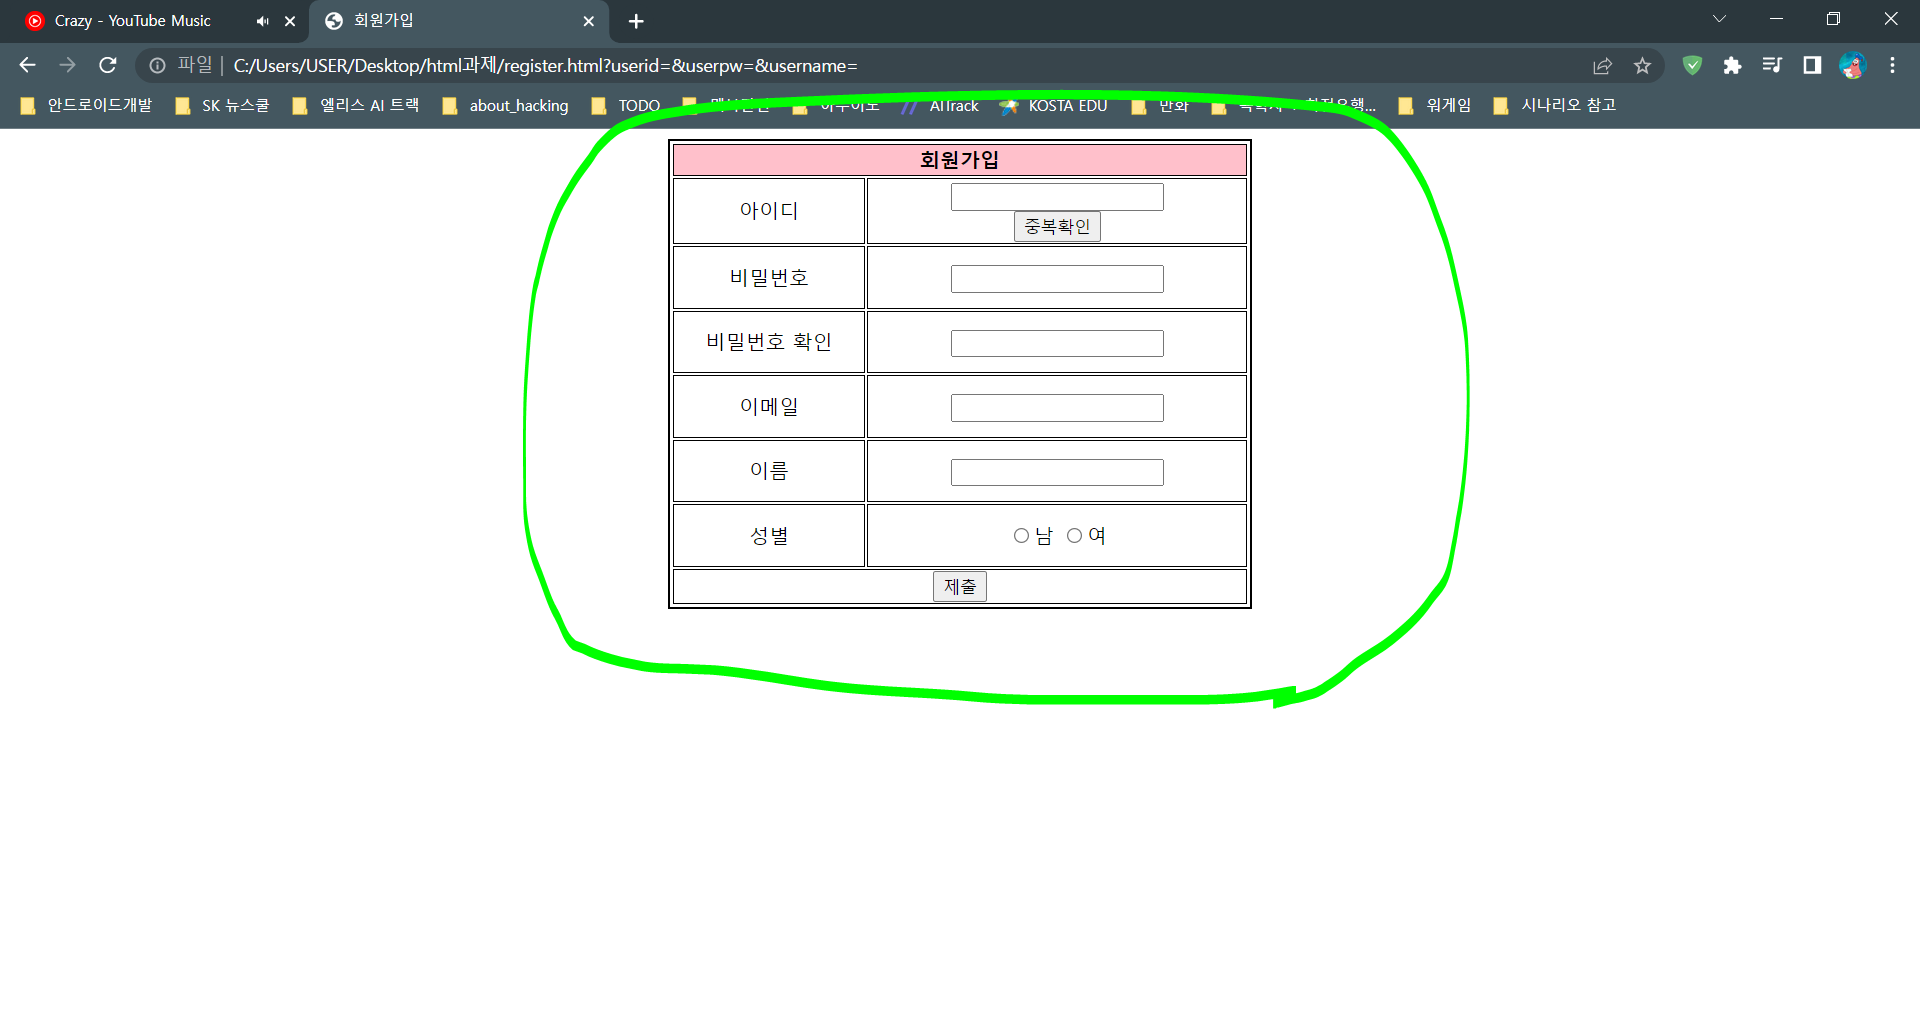
table 태그와 form 태그를 이용하여 자신만의 회원가입 페이지 만들기
- 모든 내용은 노션에 정리하며,
- 소스 코드들에 대한 설명을 기입해야하며,
- 맨 마지막에는 반드시 전체 소스 코드를 code 항목을 통해 기입하시오.
1. head 부분
<head>
    <meta charset="UTF-8">
    <title>회원가입</title>
</head>
title 태그로 ‘회원가입’ 페이지라는 걸 알기 쉽게 탭 상단에 표시한다.

2. body 부분
- 우선 회원가입 시 클라이언트 측에서 기입된 정보를 넘겨주는 form 태그를 작성한다.
<form action="" method="post">
</form>
- <table> 태그를 통해 전체적인 테이블의 틀을 만들어 준다.
<table border="2" bordercolor="black" align="center">
</table>
- 위에서 생성된 테이블 안에 테이블의 머릿말을 표시하는 <thead> 태그를 생성해준다.
<thead bgcolor="pink" align="center">
		<tr> <th colspan="3">회원가입</th> </tr>
</thead>
- 그리고 사용자가 회원가입 시 자신이 사용 할 아이디, 비밀번호, 비밀번호 확인, 이메일, 이름, 성별의 정보를 기입할 수 있도록 <tbody>와 <input> 태그를 사용해준다.
<tbody bgcolor="white">
    <tr height="50">
        <td colspan="2" width="150" align="center"> 아이디 </td>
        <td colspan="2" width="300" align="center">
            <input type="text" name="userid" id="userid">
            </br>
            <input type="button" value="중복확인">
        </td>
    </tr>
    <tr height="50">
        <td colspan="2" width="150" align="center"> 비밀번호 </td>
        <td colspan="2" width="300" align="center"> <input type="password" name="userpw" id="userpw"> </td>
    </tr>
    <tr height="50">
        <td colspan="2" width="150" align="center"> 비밀번호 확인 </td>
        <td colspan="2" width="300" align="center"> <input type="password" name="userpw_check" id="userpw_check"> </td>
    </tr>
    <tr height="50">
        <td colspan="2" width="150" align="center"> 이메일 </td>
        <td colspan="2" width="300" align="center"> <input type="email" name="useremail" id="useremail"> </td>
    </tr>
    <tr height="50">
        <td colspan="2" width="150" align="center"> 이름 </td>
        <td colspan="2" width="300" align="center"> <input type="text" name="username" id="username"> </td>
    </tr>
    <tr height="50">
        <td colspan="2" width="150" align="center"> 성별 </td>
        <td colspan="2" width="300" align="center">
            <input type="radio" name="gender" id="gender" value="m">남
            <input type="radio" name="gender" id="gender" value="f">여
        </td>
    </tr>
</tbody>
- 마지막으로 기입된 정보를 서버측에 보낼 수 있는 ‘제출’ 버튼을 생성하여 테이블의 끝을 담당하는 <tfoot>태그에 넣어준다.
<tfoot bgcolor="white" align="center">
  <tr>
      <td colspan="3">
          <input type="submit" value="제출">
      </td>
  </tr>
</tfoot>
전체코드
<!DOCTYPE html>
<html>
<head>
    <meta charset="UTF-8">
    <title>회원가입</title>
</head>
<body>
    <form action="" method="post">
        <table border="2" bordercolor="black" align="center">
            <thead bgcolor="pink" align="center">
                <tr> <th colspan="3">회원가입</th> </tr>
            </thead>
            <tbody bgcolor="white">
                <tr height="50">
                    <td colspan="2" width="150" align="center"> 아이디 </td>
                    <td colspan="2" width="300" align="center">
                        <input type="text" name="userid" id="userid">
                        </br>
                        <input type="button" value="중복확인">
                    </td>
                </tr>
                <tr height="50">
                    <td colspan="2" width="150" align="center"> 비밀번호 </td>
                    <td colspan="2" width="300" align="center"> <input type="password" name="userpw" id="userpw"> </td>
                </tr>
                <tr height="50">
                    <td colspan="2" width="150" align="center"> 비밀번호 확인 </td>
                    <td colspan="2" width="300" align="center"> <input type="password" name="userpw_check" id="userpw_check"> </td>
                </tr>
                <tr height="50">
                    <td colspan="2" width="150" align="center"> 이메일 </td>
                    <td colspan="2" width="300" align="center"> <input type="email" name="useremail" id="useremail"> </td>
                </tr>
                <tr height="50">
                    <td colspan="2" width="150" align="center"> 이름 </td>
                    <td colspan="2" width="300" align="center"> <input type="text" name="username" id="username"> </td>
                </tr>
                <tr height="50">
                    <td colspan="2" width="150" align="center"> 성별 </td>
                    <td colspan="2" width="300" align="center">
                        <input type="radio" name="gender" id="gender" value="m">남
                        <input type="radio" name="gender" id="gender" value="f">여
                    </td>
                </tr>
            </tbody>
            <tfoot bgcolor="white" align="center">
                <tr>
                    <td colspan="3">
                        <input type="submit" value="제출">
                    </td>
                </tr>
            </tfoot>
        </table>
    </form>
</body>
</html>

728x90
반응형
'Challenge > SK 뉴스쿨 정보보안과 3기' 카테고리의 다른 글
| [SK 뉴스쿨 정보보안과 3기] - SK 뉴스쿨 예비과정 #꿀팁#예비과정#협업#노션#줌#화이트해커 (0) | 2022.06.12 |
|---|---|
| [SK 뉴스쿨 정보보안과 3기] - SK 뉴스쿨 지원 동기 및 과정 #꿀팁#면접#자기소개서#정보보안#지원동기#화이트해커 (0) | 2022.06.04 |
| SK 뉴스쿨 프로그래밍 기초 파이썬 (2022.04.08) (1) | 2022.04.09 |
| SK 뉴스쿨 프로그래밍 기초 파이썬 (2022.04.07) (0) | 2022.04.08 |
| SK 뉴스쿨 프로그래밍 기초 파이썬 (2022.04.05) (0) | 2022.04.08 |


